Are you an asset manager concerned about the most cost-efficient way to have an aerial overview of your site? How should you balance the quality and accuracy of your data with the time and cost for acquisition and processing? We ran an experiment comparing 4 drone options and share our results in this blog. These are ideal for use in solar and construction site purposes.
An aerial data solution involves 3 elements: acquisition, processing and analysis
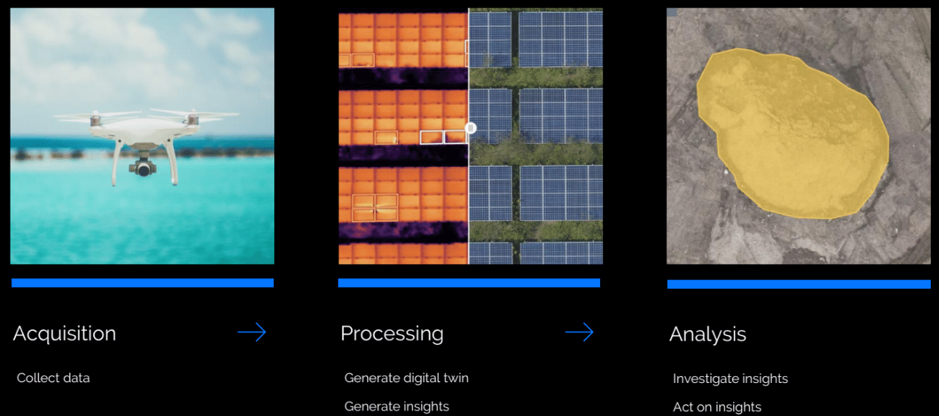
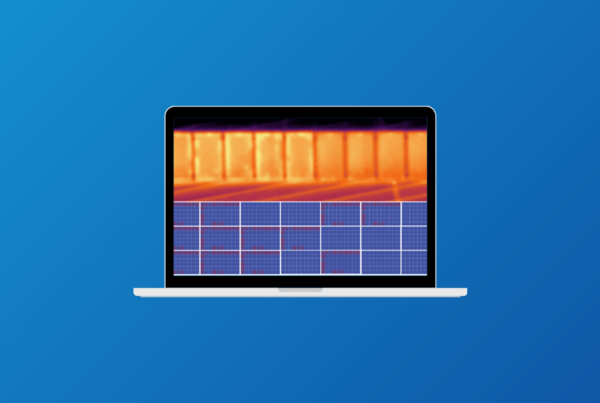
During acquisition, thousands of photos are collected by the drone for review and analysis. These images are then “stitched” together during processing. What all these images enable is the creation of a digital twin which is arguably the most valuable output from data processing. The digital twin gives you a perfect replica of your site that can be measured, analyzed and tracked for future operational needs.
The final step is analysis/reporting on the processed data. While it seems to be the last stage, in many ways it actually should be the first. By having a clear objective of your desired outcome, you can better determine how you acquire your data – again based on balancing the priorities between cost, time and accuracy.
Is quality and accuracy of output your #1 priority?
If so, let’s agree how to define and measure quality. We’ve chosen three metrics to evaluate quality. Quality can be defined as ground sampling distance, precision and accuracy. The Ground Sampling Distance (GSD) is the distance between two consecutive pixel centers measured on the ground. The bigger the value of the image GSD, the lower the spatial resolution of the image and therefore, the less visible the details. This is mainly driven by the quality of your sensor, but also the altitude at which you’re flying. So, having a better GSD means that you will be flying lower which requires more time. At Sitemark, our goal is a gap of about one-centimeter pixel for most applications.
Optionally you could invest in a higher quality sensor. We’ll talk more about this, but a quick price check shows at $6,500, the RTK (with a premium sensor) is an extra $5000 over the price of the Phantom 4 Pro (basic GPS) at $1,499.
The next quality metric is precision. When you have low precision, often it’s a result of a warp in the scan. When flying with a non-RTK drone, we don’t take the GPS location of the photos into account in the alignment of the photos, because the GPS accuracy is too low. Over large sites this means photos can start drifting a bit, because you don’t know where photos should exactly lie. This causes a warping effect.
The third metric is accuracy. Accuracy is the distance/gap from the image point to an existing external reference point such as Google Earth. It’s important that the stitched drone map perfectly fits on other maps of the same data.
Now that we have determined these quality metrics, we can balance our needs with the most cost-efficient solution.
Drone Hardware Options
Sitemark has completed over 4000 flights in the past three years resulting in solid experience in acquiring data. The series of experiments were to really look at the different results achieved when using different acquisition techniques and equipment.
The first test sets the baseline of a standard GPS drone. We used the most popular DJI Phantom 4 Pro and with no ground control points. Quick side note: ground control points (GCPs) are defined as points on the surface of the earth of known location used to geo-reference. This is a slightly unusual approach by not using any GCPs as they are the standard way of improving accuracy but helps demonstrate the point of their value.
The second option is the combination of a GPS drone, but adding five GCPs.
Now we also tested the next generation drones that DJI released in 2018, which is the Phantom 4 RTK. This will show how a premium GPS can function even without using any ground control points. We actually did a lot more setups than these but are highlighting only the most noteworthy and most commonly used in the field. As mentioned before, the Ground Control Points are global reference points that are measured in advance of the drone flight. While the drone flies over your site and captures a multitude of photos, you need a way to position these photos in space. You can do this by using the GPS data inside those photos, but this is not always completely accurate. One option is to measure some points on the ground using a very accurate GPS receiver and then marking those control points in the images. That “locks” where the images are located. Another option is to insure that the GPS data inside the photos is better. We can do this by using a relatively new technology to drones called RTK, real-time kinematics. What it does is connect the GPS system to a base station on the ground that constantly sends corrections of a GPS error in real-time, usually within a centimeter.
The X, Y and Z measurements and Test Set-up
The X and Y axis give the two dimensions on the ground with the Z calculating height or volume. If 3D representation is not critical for your needs, then you can disregard the Z measurement.
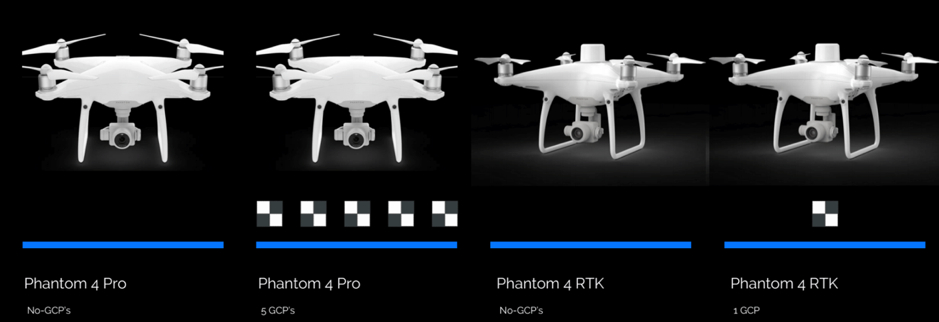
The Test Set-Up – the experiment we conducted compared accuracy of data acquisition using 4 different hardware approaches:
- Using the commonly available and popular Phantom 4 Pro, but with no GCP’s. By not using GCP’s the test can be run more quickly and therefore, cheaply
- Use the Phantom 4 Pro and include 5 GCP’s
- Substituting a highly accurate Phantom 4 RTK drone (superior GPS for triple the price), but with no GCP’s
- Using the Phantom 4 RTK and including just one GCP
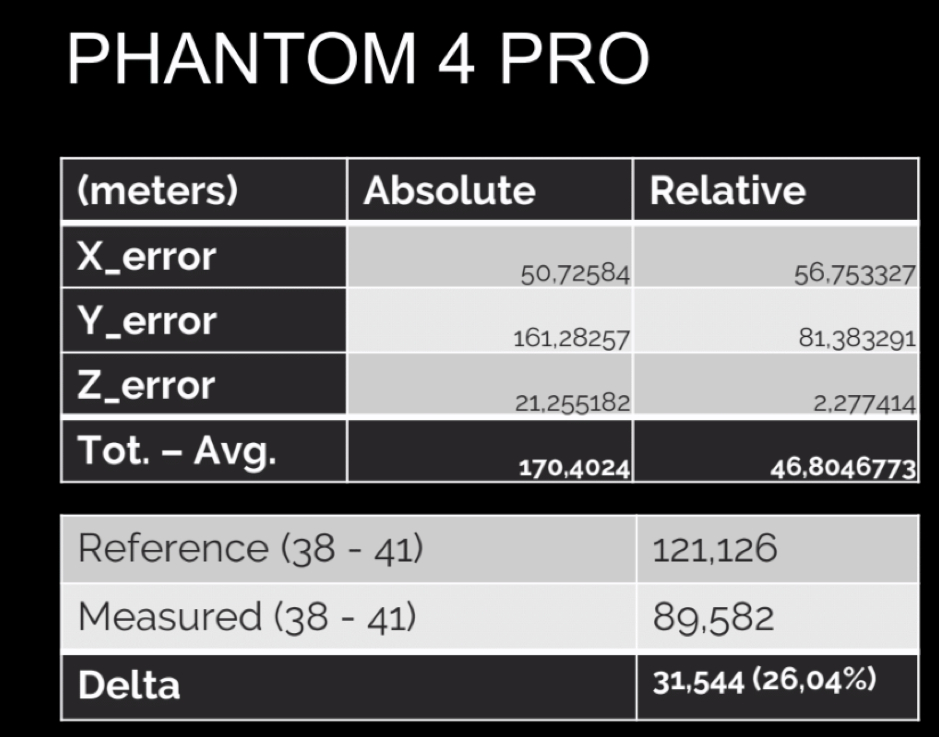
The Results
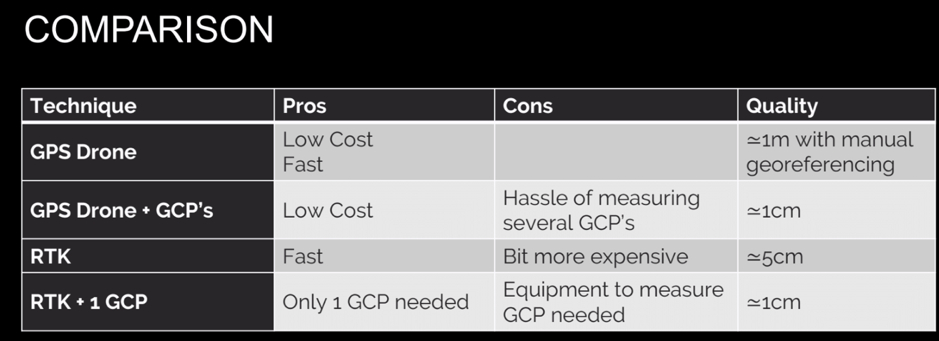
The results were surprisingly interesting. As expected, the RTK technology wins hands down over the standard Phantom 4 Pro for accuracy. And also as you would expect, the cheapest option using the Phantom 4 Pro with no GCP’s clearly gave the worst results, with the digital twin actually off by multiple meters!
Adding RTK pushed results into centimeter accuracy, but was still burdened with a 1-meter height offset. To solve the height offset we recommend adding one GCP to lock the digital twin into position.
Most projects, especially where accuracy is tied to safety, the cheapest option is simply not acceptable. But as you can see, you still have options in various price ranges that can meet your objectives.
Now of course, you have the trouble of measuring ground control points which can take some time and you also need special equipment. Just to give a ballpark on cost of a GCP, it varies greatly by region with surveyor rates anywhere from $50 – $300/hour. But to try and pinpoint a number for your budget you can estimate $50 per GCP.
So, the goal is to see if the Phantom 4 RTK drone can solve this problem for you. And if we look at the numbers, we can see that the X&Y errors are about as low as with the five GCPs and the Phantom 4 Pro solution. Let’s see how we can improve it with one GCP. The idea here is to put one GCP and it will lock the Z position. Basically, utilizing the higher accuracy of the RTK GPS, in combination with one Ground Control Point to work the Z component, your results will be very precise.
To choose your strategy, it’s important to understand your use case in order to determine what kind of quality you need. Let’s look at a couple examples, both in the solar and construction industries to judge requirements.
Use Cases
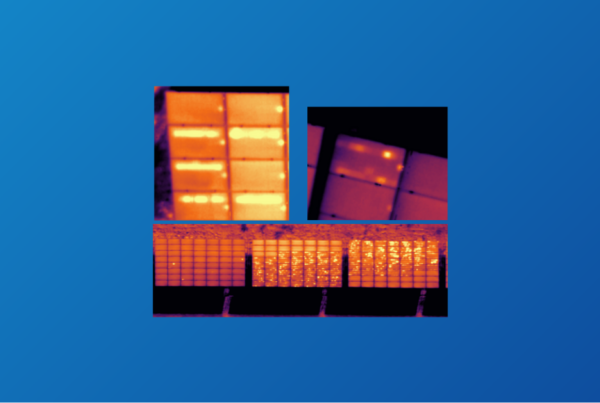
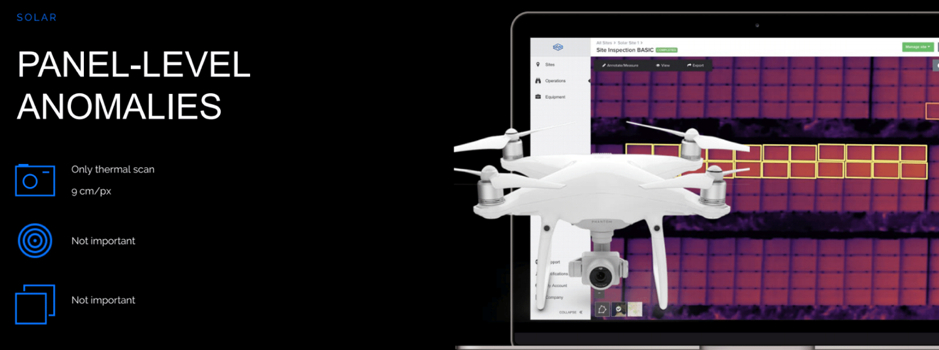
For the solar industry, it seems odd to think you needn’t be concerned with accuracy or precision, but this can sometimes be the case. The data you derive can still be sufficient for your needs. For example, you need to detect string issues, but not cell level issues like hot spots so you would only need a thermal scan. You wouldn’t need measurements or to match with another map so any drone with a normal GPS would deliver the results you need.
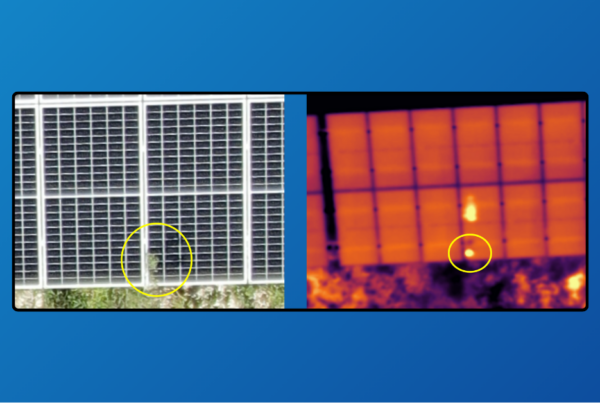
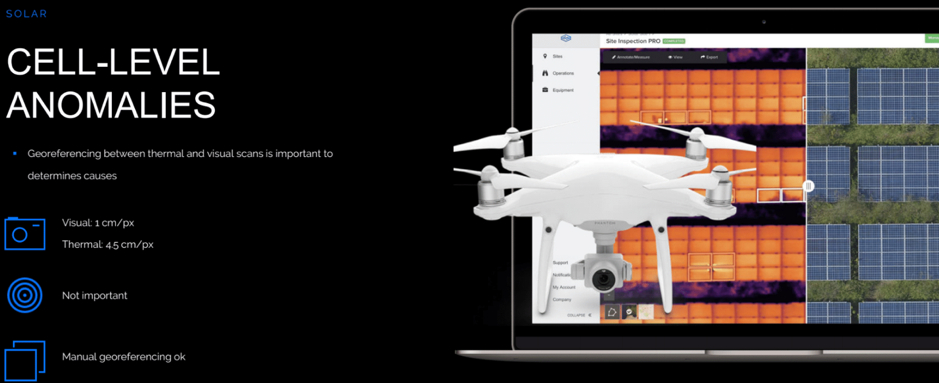
In the next use case, let’s assume you want to detect cellular level anomalies so these are hot spots or PID issues for example. Then it’s very important to note that these types of issues can have different causes such as vegetation overgrowth or soiling. Therefore, you need a visual layer to identify those causes. For this example, you will need higher resolution, but since measurements are not required precision is not really important. And you only need the accuracy to link up your visual and thermal scans. So, for this use case, manual georeferencing will do fine. You select some common points and through scans link them together in order to sync them up. A normal GPS drone can get the job done.
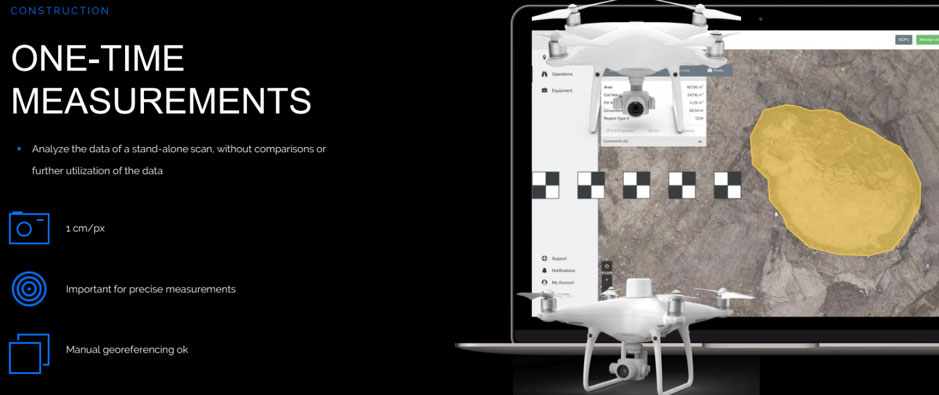
On the other hand, when we look at the Construction industry, it will be more demanding of quality. This use case examines a one-time site measurement. For this example, your goal is to get the digital twin for analysis. The results are not connected to any other data sources and you don’t need multiple scans. You will be relying heavily on visible features so you will need a good GSD and to be able to pull measurements from your scan, so it has to be very precise. Here you have the option of using a normal GPS drone with several GCPs (the number of which will be dependent on the size of the site), or the RTK is also a good option.
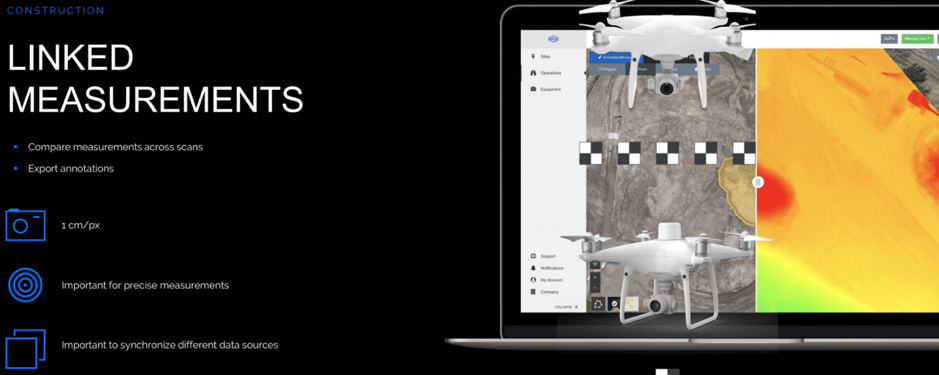
Finally, the most stringent accuracy requirements are for when you want to link measurements. Meaning you want to do multiple scans of a site and compare results. You want to combine multiple data sources, for example you might have operations maps or LIDAR scans that you want to match up. You can try and manually match them up using geo-referencing, but this is difficult and time consuming. Even an RTK drone is not enough in this situation, meaning you will still need at least one GCP for the height/volume component.
If you are interested in more information regarding accuracy requirements, you might also find the webinar this blog is based on of interest.
It is Sitemark’s mission to facilitate the implementation of aerial data analytics across industries and geographies. If you would like to share your questions and challenges with us, please get in touch and we will do our best to guide you into the digitalization era.